As an affiliate, we may earn a commission from qualifying purchases. We get commissions for purchases made through links on this website from Amazon and other third parties.
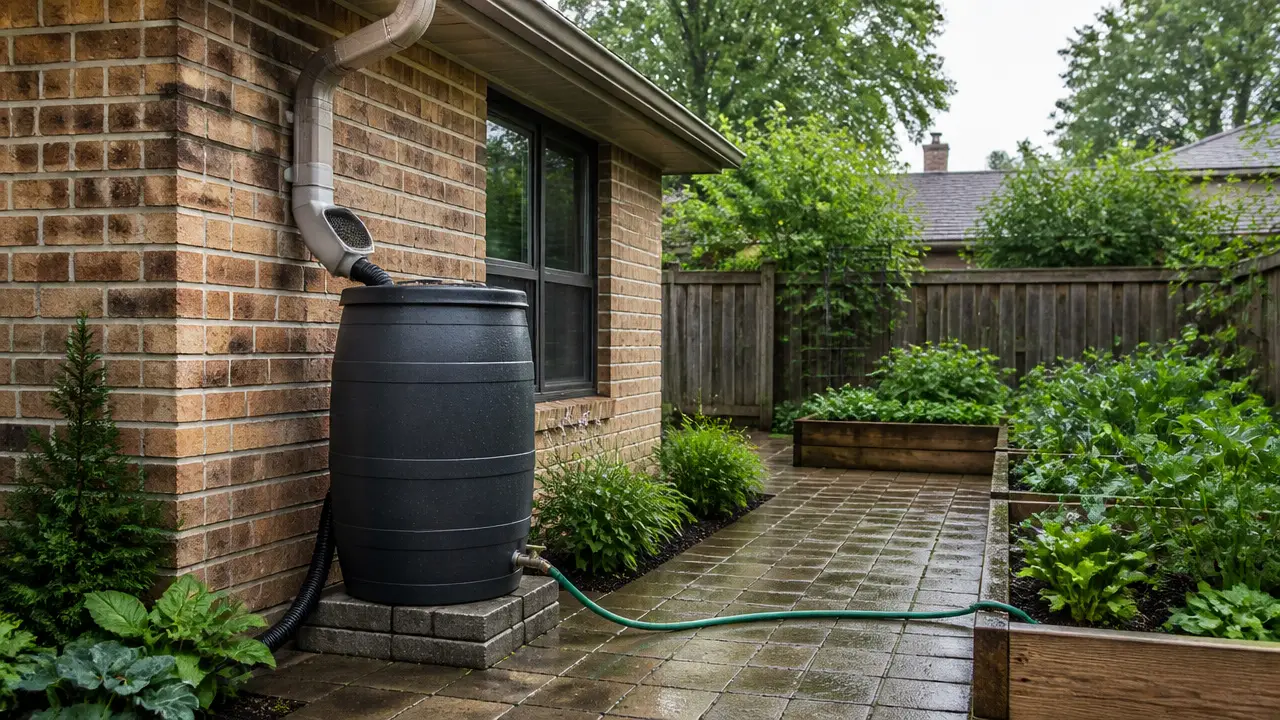
Connecting a hose to a rain barrel is usually simple. You need a watertight outlet near the bottom of the barrel, a valve or spigot that matches that outlet, and a hose with the correct thread or adapter.
The most important detail is connection compatibility. A garden hose may look like it fits a barrel valve but still have the wrong thread type. Check the outlet and hose fittings before tightening anything.
What You Need to Connect a Hose to a Rain Barrel
A typical setup has four parts:
- The rain barrel
- A sealed outlet fitting
- A valve or spigot
- A garden hose
Some rain barrels already have a threaded outlet and valve. In that case, you may only need to screw the hose onto the valve.
A DIY barrel may need a bulkhead fitting first. A bulkhead fitting passes through the barrel wall and creates a sealed connection. The valve screws into or connects to this fitting.
A basic arrangement looks like this:
Rain barrel → bulkhead fitting → valve → hose
The valve lets you start and stop the water without removing the hose.
Check the Barrel Outlet First
Before buying adapters, look closely at your rain barrel.
You may have one of these setups:
- A garden-hose-style spigot
- A threaded plastic outlet
- A bulkhead fitting without a valve
- A molded outlet that requires a specific adapter
- No outlet at all
Do not assume two fittings are compatible just because their diameters look similar.
Thread diameter and thread standard both matter. For example, many garden hoses sold in the United States use 3/4-inch garden hose thread, often called GHT. Pipe fittings may use a different thread even when they are described with a similar nominal size.
Trying to force mismatched threads can damage plastic fittings and cause leaks.
How to Connect a Hose to a Barrel With a Spigot
If your rain barrel already has a hose-compatible spigot, this is the easiest setup.
1. Inspect the hose washer
Look inside the female end of the garden hose.
There should normally be a rubber or flexible washer sitting inside the fitting. This washer makes the seal between the hose and the spigot.
A missing, cracked, or flattened washer is a common reason for leaks.
2. Screw the hose onto the spigot
Start the hose connection by hand.
Turn it until snug, but avoid excessive force. Plastic barrel fittings can crack or loosen if they are overtightened.
If the hose does not thread on smoothly within the first few turns, stop. The threads may not match.
3. Open the valve
Add some water to the barrel if necessary, then slowly open the spigot.
Check around:
- The hose connection
- The valve body
- The connection between the valve and barrel
- The bulkhead fitting, if present
A drip where the hose meets the spigot often means the hose washer needs replacing rather than additional tightening.
How to Add a Hose Connection to a Rain Barrel
If the barrel does not already have an outlet, you generally need a bulkhead fitting or another fitting designed to seal through a tank wall.
1. Choose the outlet location
Place the outlet fairly low on the barrel so gravity can push out most of the stored water.
Do not place it so close to the bottom that installing the internal part of the fitting becomes difficult.
Leaving a little space below the outlet can also allow sediment to settle beneath it instead of immediately entering the hose.
2. Make sure you can reach both sides
Many bulkhead fittings require access to the inside and outside of the barrel during installation.
Check the barrel opening before cutting anything.
If you cannot safely reach the intended location, choose a fitting system designed for installation from the accessible side rather than improvising a seal.
3. Drill the correct hole
Use the hole size specified for your bulkhead fitting.
Do not choose the hole size based only on the fitting's advertised pipe size. The required mounting hole may be larger.
Drill into an empty, stable barrel.
Clean away plastic shavings before using the barrel.
4. Install the bulkhead fitting
A bulkhead fitting normally includes a body, gasket, and retaining nut.
Follow the fitting manufacturer's orientation instructions. The gasket must sit where the fitting is designed to seal.
Keep the sealing surfaces clean and flat.
Tighten the fitting enough to compress the gasket and create a seal. Excessive tightening can distort the gasket or damage a plastic barrel.
5. Install a valve
Attach a compatible valve or spigot to the bulkhead fitting.
The valve should have:
- A tank-side connection that matches the bulkhead
- A hose-side connection that matches your hose or adapter
If threaded pipe fittings need thread sealant, use a sealant suitable for the fitting materials and intended application. Do not put thread tape on a garden-hose connection that is designed to seal with a washer.
6. Attach the hose
Install the hose washer if needed and screw the hose onto the valve by hand.
Then fill the barrel with enough water to place the new outlet under water and check for leaks.
It is better to find a small leak during a test fill than after the barrel is completely full.
Why Water May Flow Slowly From the Hose
A rain barrel connected directly to a hose usually relies on gravity.
That means it does not behave like a pressurized household faucet.
The water pressure depends largely on the difference in height between the water surface in the barrel and the hose outlet. This vertical difference is called head height.
More height generally provides more pressure.
As the barrel empties, the water level falls. Pressure at the outlet falls with it.
A barrel sitting directly on the ground may therefore provide enough flow for:
- Filling a watering can
- Slow hand watering
- Some gravity-fed drip systems
It may not provide enough pressure for:
- Many conventional sprinklers
- Long runs of small hose
- Equipment that requires a minimum inlet pressure
Raising the Barrel Can Improve Gravity Flow
Putting a rain barrel on a suitable stand increases the height between the stored water and the hose outlet.
It also provides room for a watering can beneath the valve.
However, water is heavy. Raising a full barrel creates a significant structural load.
As a useful reference, water weighs about 8.34 pounds per U.S. gallon, or about 1 kilogram per liter. A barrel holding 55 U.S. gallons contains roughly 459 pounds of water before the weight of the barrel and stand is included.
Reviewing rain barrel plumbing connections helps verify service access for sediment removal and odor prevention.
Use a stable, level base and a stand designed for the filled weight of the barrel. Do not improvise with loose blocks, unstable furniture, or an uneven surface.
Can You Run a Soaker Hose From a Rain Barrel?
Sometimes, but check the hose requirements first.
Some soaker hoses and drip irrigation parts work at relatively low pressure. Others need more pressure than a normal rain barrel can provide.
The available flow also falls as:
- The barrel empties
- The hose becomes longer
- The hose diameter becomes smaller
- Filters or fittings create additional resistance
- The irrigation system contains many outlets
For a gravity-fed system, keep the layout as simple as practical and check whether the irrigation components are rated to operate at the pressure your system can supply.
When a Pump Is Needed
A pump may be useful when gravity cannot provide enough flow or pressure.
Common examples include supplying:
- A sprinkler
- A longer irrigation line
- Higher ground
- Equipment with minimum pressure requirements
Choosing a pump involves more than matching the hose size. You also need to consider required flow rate, pressure, vertical lift, power supply, inlet conditions, and dry-run protection.
Flow rate is how much water moves through the system during a given amount of time.
A pump must also be suitable for the intended water source and use. Electrical equipment around water should be installed and operated according to its instructions and applicable electrical requirements.
Avoid Creating a Siphon or Cross-Connection Problem
Keep a rainwater hose separate from household drinking-water plumbing unless the system has been specifically designed and installed for that purpose.
Rainwater collected from a roof is not automatically potable, meaning safe for drinking.
Do not connect a rain barrel directly to a drinking-water supply in a way that could allow stored rainwater to flow backward into the potable plumbing system.
If you are planning a system that connects rainwater to household plumbing, that is no longer a simple garden-hose project. Backflow protection, plumbing rules, treatment, and other requirements may apply. A qualified professional can help design the connection correctly.
Use the Right Hose for the Intended Water Use
For garden irrigation, a normal garden hose may be suitable.
If the water will contact food-processing equipment, animals, household systems, or anything else with higher water-quality requirements, choose tubing and fittings appropriate for that use.
A hose labeled for drinking-water applications addresses the hose material. It does not make untreated rainwater safe to drink.
Drinking-water use requires a whole-system approach that considers collection surfaces, contamination control, prefiltration, appropriate treatment, maintenance, current laboratory testing, and applicable local requirements.
How to Stop a Hose Connection From Leaking
First identify exactly where the water is escaping.
Leak between the hose and spigot
Check the hose washer.
Replace it if it is:
- Missing
- Cracked
- Hardened
- Misshapen
Do not automatically reach for thread tape. A standard garden-hose connection normally seals against its washer.
Leak from a threaded pipe connection
Make sure the two fittings use compatible threads.
If the connection is designed to use thread sealant, apply a suitable sealant according to the fitting manufacturer's directions.
Do not keep tightening a leaking plastic fitting indefinitely. Excessive force can crack it.
Leak around the barrel wall
Inspect the bulkhead gasket and mounting surface.
Possible causes include:
- A dirty sealing surface
- A damaged gasket
- A fitting installed incorrectly
- An oversized or rough hole
- A curved barrel wall that prevents proper sealing
- A loose or overtightened bulkhead fitting
Drain the water below the fitting before taking the connection apart.
Keep Debris Out of the Hose
Leaves, roof grit, insects, and sediment can eventually reach the barrel outlet.
Good upstream debris control makes the hose connection easier to maintain.
Depending on the system, this may include:
- Gutter guards or regular gutter cleaning
- Downspout screens
- Inlet screens
- A first-flush device
- A screened barrel inlet
A first-flush device diverts an initial portion of roof runoff so some of the dirt accumulated on the roof does not immediately enter storage.
If sediment is a recurring problem, positioning the hose outlet slightly above the lowest part of the barrel can also help keep settled material out of the line.
Don't Forget the Overflow
Connecting a hose to the bottom outlet does not replace the barrel's overflow system.
When the barrel fills, incoming rainwater needs a safe place to go.
Use an overflow connection large enough for the system's expected inflow and route the discharge where it will not damage:
- Foundations
- Siding
- Paths
- Neighboring property
- Erodible soil
Keep overflow and inlet screens maintained so they do not become blocked.
What to Do in Freezing Weather
Water trapped inside a hose, valve, or fitting can freeze and expand.
In climates where freezing occurs, follow the barrel manufacturer's winter instructions. Depending on the system, this may involve draining the barrel, disconnecting hoses, draining exposed fittings, or taking other freeze-protection measures.
Do not assume that an empty-looking barrel means every valve and hose section is free of water.
A Simple Connection Is Usually Best
For basic garden watering, the most dependable setup is often:
Barrel → sealed bulkhead → shutoff valve → hose
Keep the number of adapters to a minimum. Every extra threaded joint is another possible restriction or leak point.
Before buying parts, confirm the thread type and size on both sides of each connection. Once everything fits correctly, test the system with a small amount of water before filling the barrel completely.
Frequently Asked Questions
Can I screw a garden hose directly onto a rain barrel?
Yes, if the barrel has a spigot or valve with a compatible garden-hose connection. Make sure the hose has a good sealing washer. If the outlet uses pipe threads or another thread standard, you will need the correct adapter.
Do I need thread tape when connecting a hose to a rain barrel?
Usually not where a standard garden hose attaches to a hose spigot. That connection normally seals with a washer inside the hose fitting. Some pipe-thread connections elsewhere in the assembly may require an appropriate thread sealant.
Why is there so little pressure from my rain barrel hose?
A normal rain barrel is gravity-fed rather than pressurized. Pressure depends largely on the height of the water above the outlet. Flow decreases as the barrel empties and can also be reduced by long hoses, small tubing, filters, fittings, and elevation changes.
Can I connect a sprinkler to a rain barrel?
You can physically connect one if the fittings match, but many sprinklers need more pressure than a gravity-fed barrel provides. Check the sprinkler's operating requirements. A properly selected pump may be necessary.
Where should the hose outlet be installed?
It is usually placed near the bottom of the barrel so most stored water can drain, but leaving some space below the outlet can allow sediment to settle. Make sure the fitting remains accessible and that the barrel wall can support a proper seal.
Why does my hose leak where it connects to the barrel?
A missing or worn hose washer is one of the most common causes. Other possibilities include mismatched threads, a loose valve, damaged fittings, or a leaking bulkhead seal.
Can rain barrel water be used through a drinking-water hose?
Using a drinking-water-rated hose does not make collected rainwater potable. Roof runoff can contain biological, chemical, and physical contaminants. Drinking-water use requires suitable collection, treatment, testing, maintenance, and compliance with applicable requirements.