As an affiliate, we may earn a commission from qualifying purchases. We get commissions for purchases made through links on this website from Amazon and other third parties.
The best DIY drip irrigation system is usually a simple, low-pressure setup with a filter, pressure regulator, mainline tubing, and small drip lines or emitters placed near each plant.
For most home gardens, a 1/2-inch mainline feeding 1/4-inch drip tubing or individual emitters is a practical starting point. It is easy to expand, repair, and adjust as plants change.
The best design depends on what you are watering. Raised beds, vegetable rows, containers, shrubs, and trees do not all need the same emitter layout or watering time.
What Makes a Good DIY Drip Irrigation System?
A good system should deliver water slowly and evenly without needing constant repairs.
A basic layout looks like this:
Water source → backflow protection if required → timer → filter → pressure regulator → mainline tubing → drip tubing or emitters
Some systems combine several of these parts into one fitting or assembly.
The important part is not the brand. The parts need to work together.
A good DIY system should have:
- Enough flow for the plants being watered
- Pressure that stays within the tubing and emitter limits
- A filter that helps prevent clogging
- Tubing and fittings that match each other
- Separate watering zones when plants have very different needs
- Flush points at the ends of lines
- Easy access for seasonal cleaning and repairs
Keeping the system simple usually makes it more reliable.
The Best Setup for Most Home Gardens
For raised beds, vegetable gardens, flower beds, and similar areas, a mainline-and-drip-line system is often the easiest design to live with.
Run larger polyethylene tubing from the water source through the garden. This becomes the mainline.
From that line, connect either:
- 1/4-inch tubing with individual emitters
- Dripline with emitters already built into it
- Short branch lines that serve containers or individual plants
A typical layout might have one mainline running beside several raised beds. Smaller drip lines branch from it into each bed.
This approach lets you repair or change one section without rebuilding the entire system.
Dripline vs. Individual Emitters
Both can work well. The better choice depends on the planting pattern.
Dripline
Dripline has emitters built into the tubing at regular spacing.
It works especially well for:
- Vegetable rows
- Raised beds
- Closely spaced flowers
- Long planted borders
- Regular planting patterns
Because the emitters are already spaced, installation is faster than punching individual emitters into tubing.
Dripline is less convenient when plants are widely separated because some emitters may release water where no plant is growing.
Individual Emitters
Individual emitters connect to tubing and release water at specific locations.
They are useful for:
- Containers
- Shrubs
- Trees
- Widely spaced vegetables
- Mixed gardens where plants have different water needs
They give you more control over where water goes.
The tradeoff is that there are more small parts to install, check, and clean.
Why a Pressure Regulator Matters
Drip irrigation normally works at lower pressure than many household hose connections provide.
A pressure regulator reduces incoming pressure to a level suitable for the drip components downstream.
Do not choose a regulator only by tubing size. Check the operating pressure required by the emitters and tubing you plan to use.
Too much pressure can cause:
- Tubing to separate from fittings
- Emitters to behave unevenly
- Leaks
- Premature wear
Too little pressure can also cause poor watering, especially on longer runs.
Always Include a Filter
Small drip passages can clog easily.
Dirt, pipe debris, algae, mineral deposits, and organic material can interfere with emitters.
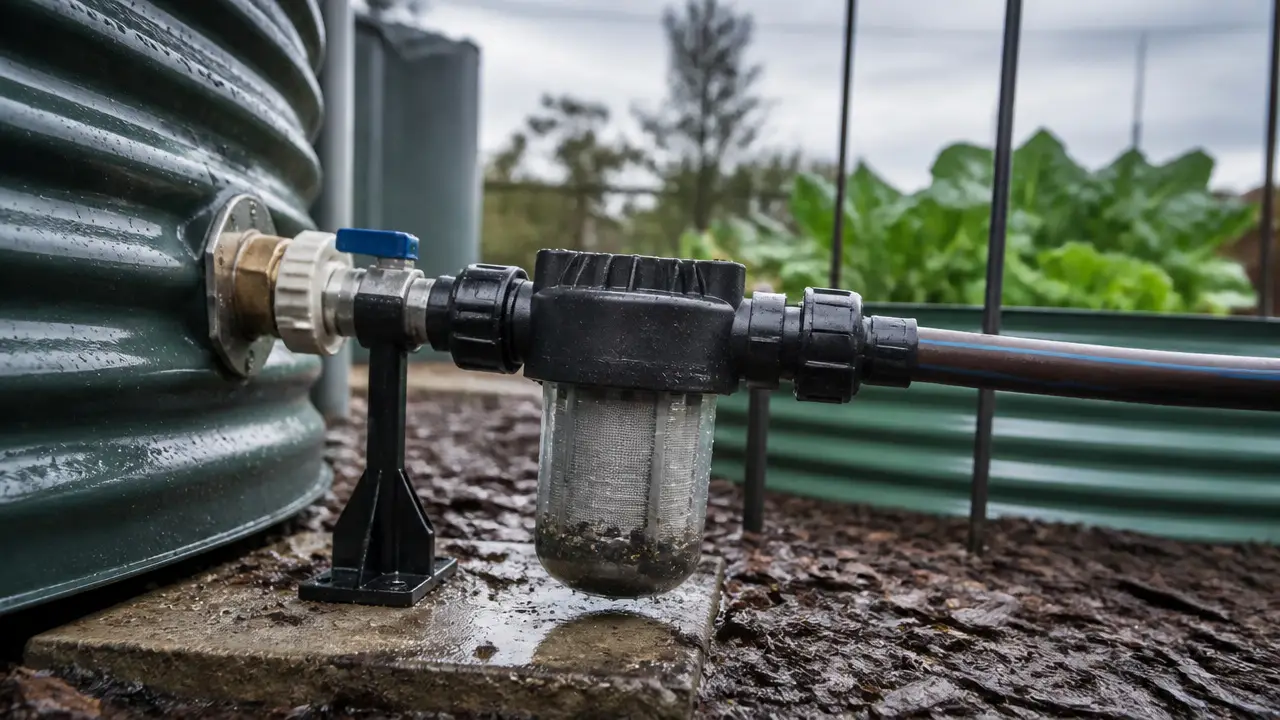
A filter near the water source helps keep larger debris out of the system.
Filters are commonly described by screen size, mesh size, or micron rating. A micron is one-thousandth of a millimeter. Smaller micron numbers describe finer filtration.
Use a filtration level that matches the emitter manufacturer's requirements.
A filter does not purify the water. Its purpose in a drip system is mainly to protect small irrigation passages from debris.
How Much Tubing Do You Need?
Start with the actual garden layout rather than buying tubing based only on total yard size.
Sketch:
- The water connection
- Garden beds or planting rows
- Containers
- Trees and shrubs
- Paths where tubing should not run
- Each planned watering zone
Measure the approximate distance from the water source to each area.
Then estimate the length of mainline and branch tubing separately.
Leave some extra tubing for routing around corners, repairs, and future changes.
Avoid making one extremely long circuit simply because the tubing reaches. Long lines and large numbers of emitters can create uneven pressure and flow.
Check Available Flow Before Building a Large System
Flow rate means how much water moves through the system during a given amount of time.
It may be listed in gallons per minute, gallons per hour, liters per minute, or another unit.
Your water source must supply enough flow for all emitters operating in that zone.
For example, imagine a garden zone with 20 emitters rated for the same flow. The total required flow is approximately:
Number of emitters × flow per emitter = zone flow
If 20 emitters each use 1 gallon per hour:
20 × 1 GPH = 20 GPH
Actual system performance also depends on pressure, tubing length, elevation, fittings, and the emitter design.
If a planned zone becomes too large, divide it into two or more zones instead of trying to force everything through one line.
Separate Plants With Different Water Needs
One of the most common DIY mistakes is putting every plant on the same schedule.
A vegetable bed may need frequent irrigation while established shrubs nearby may need deeper, less frequent watering.
Containers may dry out even faster.
Consider separate zones for:
- Containers
- Vegetable beds
- Trees and shrubs
- Newly planted areas
- Established landscape plants
A zone is simply a group of irrigation lines operated together.
Separating zones gives you more control over watering time without constantly changing emitters.
A Simple Raised-Bed Drip System
Raised beds are especially easy to adapt to drip irrigation.
A practical arrangement is:
Water source → timer → filter → regulator → mainline → individual bed lines
The mainline runs past the beds.
A connection from the mainline feeds each bed.
Within the bed, dripline can run along planting rows. Keep the line arrangement based on plant spacing and soil behavior rather than following a fixed universal distance.
Sandy soil tends to let water move downward quickly. Heavier soil often spreads water sideways more readily.
Run the system and check how the soil actually wets before deciding that the original line spacing is correct.
A Simple Drip System for Containers
Containers usually work better with individual branch tubes rather than long sections of dripline.
A mainline can run past the pots. Small tubing then branches toward each container.
Each pot can receive one or more emitters depending on its size, soil mix, plant, and water demand.
Large containers may wet more evenly with more than one watering point.
Secure the small tubing so it does not get pulled out of the pot during gardening or cleaning.
Also check containers regularly. A blocked emitter can stress a potted plant quickly because the soil volume is small.
Can You Run Drip Irrigation From a Rain Barrel?
Yes, but gravity-fed rain barrels require more planning than systems connected to pressurized household water.
Water pressure from stored water depends largely on head height.
Head height is the vertical distance between the water surface in the storage tank and the irrigation outlet.
A barrel sitting only slightly above the garden may produce very little pressure.
That can create problems with emitters designed for pressurized systems.
For gravity-fed rainwater irrigation, look for components specifically suited to low-pressure operation.
Also keep the system small enough that the available flow can reach all outlets reasonably evenly.
Rainwater Requires Good Pretreatment
Roof runoff can carry leaves, grit, pollen, insects, organic matter, and other debris.
Before it reaches small drip passages, a rainwater system usually benefits from debris control upstream of storage and additional irrigation filtration downstream.
A first-flush device may also be part of some rainwater systems. It diverts an initial portion of roof runoff that may contain a higher concentration of debris from the roof.
A first-flush device does not make rainwater clean or safe to drink. It is only one possible part of runoff management.
For irrigation, regularly inspect the tank, outlet, filter, and drip lines for sediment and biological buildup.
What About an IBC Tote or Larger Cistern?
Larger storage tanks can supply a drip system, but tank size does not automatically mean good irrigation pressure.
A nearly full IBC tote at ground level may still have limited gravity pressure.
If the irrigation system needs more pressure or flow than gravity can provide, a pump may be required.
Pump selection should consider:
- Required flow
- Required pressure
- Vertical lift
- Pipe or hose length
- Friction losses
- Available power
- Dry-run protection
- Pump compatibility with the water source
Explore building a DIY gravity drip irrigation system to assess dependable irrigation control without mains pressure.
Avoid choosing a pump based only on its maximum advertised pressure or flow. A pump produces different flow at different pressures.
Electrical equipment used around stored water must be installed and protected appropriately. Bring in a qualified professional where electrical work, permanent wiring, or a more complex pressure system is involved.
Use a Timer Carefully
A timer can make drip irrigation much easier to manage.
It can also hide problems.
A system may continue running even when:
- An emitter is clogged
- A fitting has separated
- A line has been cut
- A container is overflowing
- A filter is blocked
A timer should reduce routine work, not replace inspections.
Check the system while it is operating from time to time.
How Long Should Drip Irrigation Run?
There is no single correct watering time.
Watering duration depends on:
- Emitter flow
- Number of emitters per plant
- Soil type
- Root depth
- Weather
- Plant size
- Sun exposure
- Mulch
- Container size
- Recent rainfall
Instead of starting with a fixed schedule from another garden, run your system and check the soil.
The goal is to wet the active root area without creating unnecessary runoff or leaving the deeper soil dry.
After watering, inspect the soil below the surface. Adjust run time and frequency based on how far the moisture traveled.
Seasonal changes matter too. A schedule that works during mild weather may supply too much or too little water later.
How to Build a Basic DIY Drip System
1. Divide the Garden Into Watering Zones
Group plants with similar watering needs.
Keep very different plants on separate zones when practical.
2. Check the Water Source
Confirm that you have enough pressure and flow for the planned system.
For tanks and rain barrels, determine whether the system will operate by gravity or use a pump.
3. Choose the Watering Method
Use dripline for regular rows and individual emitters for scattered plants, shrubs, or containers.
You can use both within the same garden when the pressure and flow requirements are compatible.
4. Install Filtration and Pressure Control
Place the required filter and pressure regulator near the beginning of the irrigation system.
Follow the installation direction shown on the components.
5. Run the Mainline
Route the larger tubing close to the areas being watered.
Avoid placing it where it will be damaged by digging, mowing, foot traffic, or garden tools.
6. Add Branch Lines
Connect dripline or smaller tubing to the mainline.
Use fittings designed for the exact tubing size.
Tubing described with similar nominal sizes is not always interchangeable. Outside diameter, inside diameter, wall thickness, and fitting style can vary.
7. Add Emitters
Place emitters where plants actually need water.
Do not assume every plant needs the same number or emitter flow.
8. Flush the Lines
Before closing the ends, run water through the tubing to remove installation debris.
Install end closures after flushing.
Provide a practical way to reopen line ends for future flushing.
9. Test the Entire Zone
Operate the system and inspect:
- Every fitting
- Every emitter
- End sections
- Elevated areas
- Low spots
- The plants farthest from the water source
Correct leaks and uneven watering before burying tubing under mulch.
Common DIY Drip Irrigation Mistakes
Skipping the Filter
Drip emitters have small passages. Debris that would move through a garden hose can clog them.
Using Too Much Pressure
Higher pressure does not automatically improve drip irrigation.
Excess pressure can cause leaks and fitting failures.
Making Lines Too Long
Long runs can result in uneven flow, especially with small tubing or low-pressure water sources.
Putting Too Many Emitters on One Zone
Every emitter adds to the total flow requirement.
If the water source cannot supply that flow while maintaining suitable pressure, performance becomes uneven.
Mixing Incompatible Tubing and Fittings
Drip tubing is not perfectly standardized across every system.
Check actual tubing dimensions and fitting compatibility.
Forgetting Flush Points
Sediment can accumulate inside irrigation lines.
You should be able to open the ends and flush them periodically.
Treating the Timer as a Set-and-Forget Device
Plants, weather, emitters, and soil conditions change.
Inspect the garden and adjust the schedule instead of leaving the timer unchanged all season.
Maintenance Is Part of the System
A well-designed drip system still needs maintenance.
During the growing season:
- Check emitters for clogging
- Look for leaks
- Clean the filter
- Inspect connections
- Flush lines when needed
- Check soil moisture
- Adjust watering as weather changes
Rainwater-fed systems may need more frequent attention if stored water carries fine sediment or organic material.
At the end of the season, inspect damaged tubing and fittings so you are not rebuilding the system during the next planting period.
Protecting Drip Irrigation in Freezing Weather
Water trapped inside tubing, filters, regulators, valves, pumps, and timers can freeze.
Freeze protection depends on the system design and local winter conditions.
Where freezing is expected, follow the component manufacturer's winterization instructions. Disconnect or drain vulnerable parts where the design allows.
Do not assume that flexible irrigation tubing makes the entire system freeze-proof.
Pumps, filters, valves, pressure regulators, and rigid fittings may be especially vulnerable.
Permanent irrigation systems or systems that are difficult to drain may need professional winterization.
When DIY Stops Being Simple
Basic garden drip irrigation is often a manageable DIY project.
Professional help becomes more useful when the system involves:
- Large elevation changes
- Several automatic zones
- Permanent underground plumbing
- High-flow pumps
- Pressure tanks
- Electrical wiring
- Complex rainwater cistern systems
- Connections to household plumbing
- Backflow requirements
- Large landscaped areas
Local plumbing and irrigation requirements can also affect how a system connects to a potable household water supply. Check with the appropriate local authority when permanent plumbing or backflow protection rules apply.
Choosing the Best DIY System for Your Garden
For most small and medium home gardens, start simple:
Use a filtered and pressure-regulated mainline, then branch into dripline for regularly spaced plants and individual emitters for containers or widely spaced plants.
Keep plants with different water needs on different zones where practical.
If you are using stored rainwater, choose emitters and controls that can operate with the pressure you actually have. A low tank may need low-pressure irrigation components or a properly sized pump.
Most importantly, build the system so you can inspect, flush, repair, and adjust it. A slightly simpler system that is easy to maintain will usually serve a garden better than a complicated setup that is difficult to troubleshoot.
Frequently Asked Questions
Is 1/4-inch or 1/2-inch tubing better for drip irrigation?
They usually serve different purposes rather than competing with each other. Larger tubing commonly works as the mainline, while 1/4-inch tubing carries water short distances to individual emitters or small planting areas. Actual dimensions and fitting compatibility should always be checked.
Do I need a pressure regulator for DIY drip irrigation?
You usually need one when the water source pressure is higher than the operating range of the drip components. Follow the pressure requirements of your tubing and emitters rather than assuming household water pressure is suitable.
Can I connect drip irrigation directly to a garden hose?
A hose connection can supply a drip system, but the setup may still require a filter, pressure regulator, timer, and any backflow protection required for the connection. The hose alone does not control pressure or protect emitters from debris.
Can drip irrigation work without a pump?
Yes. Household water connections often provide pressure without an irrigation pump. Elevated tanks and rain barrels can also operate some low-pressure systems by gravity. Whether gravity is enough depends on head height, required flow, tubing layout, and the irrigation components used.
Is dripline better than soaker hose?
Dripline uses defined outlets or emitters, which can make flow easier to plan and control. Soaker hose releases water through a porous wall and may behave differently as pressure, hose length, and elevation change. Either can work in the right situation, but dripline often gives more control in a planned irrigation system.
How often should drip irrigation lines be flushed?
There is no universal schedule. Flush when installing the system and periodically based on water quality, sediment buildup, emitter performance, and manufacturer guidance. Systems using stored rainwater may require more frequent checks.
Should drip irrigation be buried?
Many garden drip lines are placed on the soil surface and covered lightly with mulch rather than buried deeply. Keeping connections reasonably accessible makes inspection and repairs easier. Follow the tubing manufacturer's installation guidance, especially for products designed specifically for subsurface use.